- Winkelsteckverbinder, m
- угловой соединитель
угловой соединитель
-EN
right-angle connector
connector in which the axis of the cable outlet is at right-angle with the axis of the mating face
[IEV number 581-26-23]FR
connecteur à angle droit
connecteur dans lequel l’axe de sortie du câble forme un angle droit avec l’axe de la face d’accouplement
[IEV number 581-26-23]
Рис. Phoenix Contact
Угловой соединитель (приборная вилка)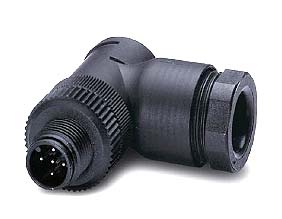
Рис. Phoenix Contact
Угловой соединитель (кабельная вилка) в пластмассовом корпусе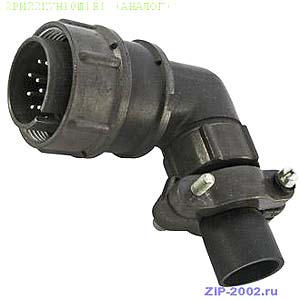
[http://www.zip-2002.ru/?z=grey&i=97&p=394&id=78433]Отечественный соединитель(российского производства) (кабельная вилка).
Угловая часть в российских соединителях назывется угловым кожухом или угловым патрубком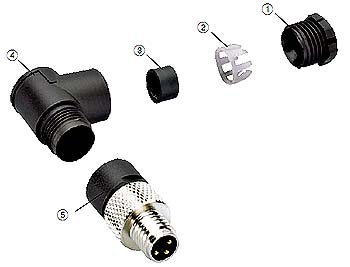
-
RU - Нажимная гайка
EN - Pressure nut
DE - Druckmutter -
RU - Зажим
EN - Clamping cage
DE - Klemmkorb -
RU - Уплотнитель кабеля
EN - Cable seal
DE - Kabeldichtung -
RU - Угловой корпус
EN - Angular housing
DE - Winkelgehäuse -
RU - Контактный (штыревой) наконечник
EN - Male insert
DE - Steckeinsatz

Параллельные тексты EN-RU
Параллельные тексты DE-RUEN
DE
RU
Assembly
1. Push the pressure screw, clamping cage, cable seal and the angular housing over the cable.
2. Strip the cable to a length of 12 mm.
3. Strip the wires to a length of 3 mm and twist them together.
4. Solder the wires to the solder connections of the male insert.
5. Insert the male insert in the desired position in the angular housing and screw it in tightly.
6. Screw the pressure screw tightly into the housing.
[Phoenix ContactKonfektionierung
1. Fädeln Sie die Druckschraube, den Klemmkorb, die Kabeldichtung und das Winkelgehäuse über das Kabel.
2. Manteln Sie das Kabel auf einer Länge von 12 mm ab.
3. Isolieren Sie die Adern auf einer Länge von 3 mm ab und verdrillen Sie diese.
4. Löten Sie die Adern an die Lötanschlüsse des Steckeinsatzes an.
5. Führen Sie den Steckeinsatz in der gewünschten Position in das Winkelgehäuse ein und schrauben Sie ihn fest.
6. Schrauben Sie die Druckschraube fest in das Gehäuse.
[Phoenix Contact]Порядок сборки соединителя
1.Пропустите кабель через нажимную гайку, зажим, кабельный уплотнитель и угловой корпус соединителя.
2. Снимите с кабеля оболочку на участке длиной 12 мм.
3. Снимите 3 мм изоляции с жил кабеля. Скрутите проволоки каждой жилы.
4. Припаяйте жилы кабеля к соответствующим хвостовикам контакт-деталей контактного наконечника.
5. Подтягивая кабель, надвиньте контактный наконечник на корпус соединителя и плотно прикрутите его с помощью накидной гайки.
6. Сдвиньте уплотнитель кабеля и зажим внутрь корпуса соединителя
7. Плотно вкрутите нажимную гайку в корпус соединителя.
[Перевод Интент]Тематики
- соединитель электрический (разъем)
Классификация
>>>EN
- angled connector
- right-angle connector
DE
- Winkelsteckverbinder, m
FR
- connecteur à angle droit
Смотри также
Немецко-русский словарь нормативно-технической терминологии. academic.ru. 2015.
угловой соединитель — EN right angle connector connector in which the axis of the cable outlet is at right angle with the axis of the mating face [IEV number 581 26 23] FR connecteur à angle droit connecteur dans lequel l’axe de sortie du câble… … Справочник технического переводчика
Winkelsteckverbinder, m
18+
© Академик, 2000-2025
- Обратная связь: Техподдержка, Реклама на сайте
Экспорт словарей на сайты, сделанные на PHP, Joomla, Drupal, WordPress, MODx.